Core Concepts
Reference
How-to Guides
Troubleshooting
Feedback
Deploying Django on Aptible: Comprehensive Guide
Discover how to deploy and manage a Django application on Aptible with this comprehensive guide.
Overview
This guide will walk you through the process of launching a barebones Django Application on Aptible using the Aptible CLI.
📘 Deploy this starter template now and start building your app in minutes! This is the easiest and quickest way to get started with Django. You can start building your app without having to worry about the details of deployment.
Quick Links
Deploy a Starter Template | Live example | Github Repo
Deploy a Django App on Aptible
Deploying a Django app using Docker Compose simplifies the setup by orchestrating the app, its dependencies, and configurations in a harmonized environment. Docker Compose enables developers to define multi-container applications, ensuring consistency and eliminating compatibility issues. Users clone the app's repository and set up a docker-compose.yml file detailing services and configurations.
Launching the entire application environment in Aptible is then just a matter of running a single Docker Compose command. This method streamlines scaling, maintenance, and ensures consistency across different environments, making Django app deployment more efficient and reliable.
Prerequisites
This Django deployment guide has the following prerequisites:
- Create an Aptible account
- Install Git
- Install pip
- Install the Aptible CLI
- Add an SSH public key to your Aptible user account.
- Install Docker and Docker Compose.
Clone the Repo
Clone the template-django repo to your local machine.
To get a copy of the Django app's source code on your local machine, use the git clone command:
git clone https://github.com/your_username/your_django_app.gitThe code above will create a directory named your_django_app in your current directory, containing all the files from the repository.
Make sure to replace your_username and your_django_app with the appropriate username and repository name. If you're using a Git platform other than GitHub, like GitLab or Bitbucket, adjust the URL accordingly.
Static and Media Files Handling
Handling static and media files correctly is a common challenge when deploying Django applications. Here's a step-by-step guide for setting up static and media files handling for a Django app on Aptible.
Step 1: Set up File Storage on Amazon S3:
Due to the ephemeral nature of containers in platforms like Aptible, it's common to use cloud storage solutions like Amazon S3 for serving media files.
Create an S3 bucket via the AWS Management Console or AWS CLI. Take note of your S3 bucket name because we’ll use it later. Note your AWS credentials (we’ll use them later): AWS_ACCESS_KEY_ID and AWS_SECRET_ACCESS_KEY.
Step 2: Install Required Packages
To integrate Amazon S3 with your Django app, you'll need some packages:
pip install boto3 django - storagesStep 3: Configure Django to Use S3:
Modify your Django settings.py:
INSTALLED_APPS += ['storages']

AWS_ACCESS_KEY_ID = os.environ.get('AWS_ACCESS_KEY_ID')
AWS_SECRET_ACCESS_KEY = os.environ.get('AWS_SECRET_ACCESS_KEY')
AWS_STORAGE_BUCKET_NAME = os.environ.get('AWS_STORAGE_BUCKET_NAME')
AWS_S3_CUSTOM_DOMAIN = '%s.s3.amazonaws.com' % AWS_STORAGE_BUCKET_NAME
AWS_S3_OBJECT_PARAMETERS = {
    'CacheControl': 'max-age=86400',
}

# Static files (CSS, JavaScript, images)
AWS_STATIC_LOCATION = 'static'
STATIC_URL = 'https://%s/%s/' % (AWS_S3_CUSTOM_DOMAIN, AWS_STATIC_LOCATION)
STATICFILES_STORAGE = 'storages.backends.s3boto3.S3Boto3Storage'

# Media files (uploads)
AWS_PUBLIC_MEDIA_LOCATION = 'media/public'
DEFAULT_FILE_STORAGE = 'storages.backends.s3boto3.S3Boto3Storage'
MEDIA_URL = 'https://%s/%s/' % (AWS_S3_CUSTOM_DOMAIN, AWS_PUBLIC_MEDIA_LOCATION)
aptible config:set --app your-app-name AWS_ACCESS_KEY_ID=your_access_key AWS_SECRET_ACCESS_KEY=your_secret_key AWS_STORAGE_BUCKET_NAME=your_bucket_name
Step 4: Set Environment Variables in Aptible
Update the environment variables on Aptible to include your AWS credentials (replace your_access_key below with your AWS_SECRET_ACCESS_KEY) and the S3 bucket name (replace your_bucket_name below):
aptible config: set--app your - app - name AWS_ACCESS_KEY_ID = your_access_key AWS_SECRET_ACCESS_KEY = your_secret_key AWS_STORAGE_BUCKET_NAME = your_bucket_nameStep 5: Run Collectstatic
Whenever you deploy or make changes to static files, run the collectstatic command to push them to S3:
python manage.py collectstaticThis will collect all your static files and upload them to your S3 bucket.
Step 6: Handling User Uploaded Files (Media)
With the above configuration, any file that gets uploaded by a user will be stored in the media/public directory in your S3 bucket and served using an auto-generated S3 URL.
Step 7: (Optional) Secure Media Files
If you wish to serve media files privately, you can use Amazon S3's signed URLs. This requires changes to your Django views and models to generate signed URLs that expire after a given time. You can use boto3 for secure S3 media delivery.
Using Docker Compose
Docker Compose ensures that developers work in a consistent environment that closely mirrors production, minimizing the risk of deployment problems. Aptible offers a secure and compliant platform that is optimized for the deployment of containerized applications.
Together, these tools create an environment where Django apps can be developed, tested, and deployed with maximum efficiency and reliability. This makes the combination of Docker Compose and Aptible a popular choice for Django developers.
Local Development with Docker Compose:
Step 1: Django Docker Configuration
Create a Dockerfile in your Django app's root directory:
FROM python: 3.8 - slim

WORKDIR / app

COPY requirements.txt / app /
  RUN pip install--no - cache - dir - r requirements.txt

COPY. / app /

  CMD["gunicorn", "myapp.wsgi:application", "--bind", "0.0.0.0:8000"]
Make sure to replace myapp with the name of your Django project and ensure you have a requirements.txt in your root directory that lists your Python dependencies.
📘 Note: not all Django apps usegunicorn. It's just one option among several. When you run a Django app in development mode usingpython manage.py runserver, it uses Django’s built-in development server. This server is suitable for development but is not recommended for production use due to performance and security concerns. For production deployments, users can deployuWSGIandmod_wsgi(an Apache module There are also several other servers and methods that exist to serve Django apps.
Step 2: Docker Compose Setup
Create a docker-compose.yml in the root directory:
version: '3'

services:
  web:
    build: .
    ports:
      - "8000:8000"
    depends_on:
      - db
  db:
    image: postgres:13
    environment:
      - POSTGRES_DB=mydatabase
      - POSTGRES_USER=user
      - POSTGRES_PASSWORD=password
Step 4: Run your Django app with Docker Compose
docker-compose upYou should be able to access your Django app at http://localhost:8000.
Deploy to Aptible
Step 1: Push your Docker Image to Aptible
Build your Docker Image
docker build -t your-django-image-name /path/to/your/buildPush the image to Aptible’s Registry
📘 docker tag: This command assigns a new tag to an existing Docker image. It's useful when you want to have multiple tags pointing to the same image ID, or when you want to rename tags, or point existing tags to a different image.
docker tag your-django-image-name:latest registry.aptible.com/my-aptible-app/your-django-image-name:latestIn this command, you're creating (or overwriting) a tag registry.aptible.com/my-aptible-app/your-django-image-name:latest for the image your-django-image-name:latest.
📘 docker push This command pushes a Docker image or a repository to a registry.
docker push registry.aptible.com/my-aptible-app/your-django-image-name:latestAfter tagging the image in the previous step, you're now pushing the image with its new tag to the Aptible registry.
Step 2: Deploy your Docker Image
aptible deploy --app APP_HANDLE --docker-image registry.aptible.com/my-aptible-app/your-django-image-name:latest.Step 3: Configure Environmental Variables
Set up environment variables for your Django app, especially for SECRET_KEY, DEBUG, ALLOWED_HOSTS, and database configurations.
aptible config:set --app APP_HANDLE SECRET_KEY=mysecretkey DEBUG=False ALLOWED_HOSTS=mydomain.comThe SECRET_KEY in Django is a critical setting used for cryptographic signing. It's essential for the security of a Django application and should be kept secret.
- Purpose of
SECRET_KEY: TheSECRET_KEYis used for session verification, CSRF protection, and more. It's vital for ensuring data integrity and security. - Generation: When starting a new Django project using the django-admin startproject command, Django automatically generates a unique SECRET_KEY for you. This is typically found in the
settings.pyfile of your project. - Setting for Deployment: For deployments, especially in production, it's essential not to hard-code this key in
settings.pyor any other public file (e.g., version control). Instead, it should be set as an environment variable, ensuring it's not exposed or easily accessible. - Safety Precautions: Once a
SECRET_KEYis set, it should not be changed without care, as doing so will invalidate certain data tied to the original key, like existing user sessions or reset tokens. - Generating a New
SECRET_KEY: If a user needs to generate a newSECRET_KEY(for instance, if they believe their existing key might have been compromised), there are several ways to do so:
- Use Django's built-in utilities:
- pythonCopy code
- from django.core.management.utils import
get_random_secret_keyby printing(get_random_secret_key())or using online tools or other methods to generate a 50-character random string.
Database Setup
Step 1: Create a Database in Aptible
aptible db:create my-django-db --type postgres --environment ENV_HANDLEThis command will provide you with a postgres database URL. Aptible also supports the following database types:
- MySQL
- MongoDB
- CouchDB
- Elasticsearch
- InfluxDB
- Redis
- RabbitMQ Learn more about databases in Aptible.
Step 2: Configure Django to Use the Aptible Database:
First, retrieve the DATABASE_URL from Aptible:
aptible db:url HANDLESet the database URL as an environment variable for your Django app:
aptible config:set --app APP_HANDLE DATABASE_URL=your_database_urlIn your Django settings.py, use a package like dj-database-url to parse the DATABASE_URL
import dj_database_url
DATABASES = {
    'default': dj_database_url.config(default=os.environ.get('DATABASE_URL'))
}
Make sure to have dj-database-url in your requirements.txt.
Testing and Quality Assurance
Ensuring the reliability, functionality, and performance of your Dockerized Django app is more than just a technical requirement. It is also about safeguarding the user experience and your brand's reputation. When deploying on a platform like Aptible, these aspects of quality assurance take on even greater importance. Aptible is designed to handle secure and compliant deployments, making it a popular choice for sensitive applications. Therefore, your testing must be thorough, covering not just app-specific checks but also the hosting environment and platform-specific nuances. As you proceed with the deployment of your Django app on Aptible, it is essential to adopt a holistic approach to testing and quality assurance. This will ensure that the app not only functions optimally but also takes advantage of Aptible's unique features and benefits.
Note: Replace [APP_HANDLE] and [ENVIRONMENT_HANDLE] with appropriate names for your application and environment.
Step 1: Setting up your Test Environment on Aptible Start by creating a new environment for testing on Aptible. This ensures that your main app remains unaffected during testing.
Use the aptible apps:create [APP_HANDLE] --environment [ENVIRONMENT_HANDLE] command to set up a separate testing environment.
Step 2: Setting up your Test Environment on Aptible After setting up your tests locally, push your Dockerized Django app to your Aptible test environment.
Use the aptible deploy --app [APP_HANDLE] command after making sure your Dockerfile is correctly configured. In other words, ensure:
- You're using an appropriate base image for your Django app,
- All your project's dependencies are installed,
- Your app reads all required environment variables like
SECRET_KEY,DEBUG,ALLOWED_HOSTS - Configurations related to serving static and media files are correctly set up
- The
CMDorENTRYPOINTin yourDockerfileshould correctly start your Django app. - The Dockerfile does not contain sensitive information or secrets
- Sending your application logs to
stdoutorstderr - Creating a mechanism to handle database migrations.
Step 3: Running Unit Test
Once deployed, run your unittest or pytest tests using:
aptible ssh --app [APP_HANDLE] --command "python manage.py test [app_name]"Step 4: Integration and Functional Tests Ensure your database and other required services are linked.
Run integration and functional tests using the above SSH command, but specify the appropriate test files.
Step 5: Automate Testing Workflow Consider using Aptible's CI/CD integrations to automatically run tests when changes are pushed to your codebase.
Step 6: Performance Testing Deploy tools like 'Locust' or 'JMeter' on Aptible and simulate user loads to gauge performance.
Step 7: Security Testing Regularly scan your deployed app on Aptible using the Aptible security scans to check for vulnerabilities.
Step 8: Docker-specific Testing on Aptible Ensure that your Django app interacts correctly with other services in the test environment on Aptible by running integration tests that touch all linked services.
Step 9: Regression Testing Regularly redeploy and retest your app using the above steps whenever there are changes to your codebase.
Step 10: Regression Testing Once testing is complete and you're satisfied, ensure to remove the test environment to avoid unnecessary charges.
aptible apps:deprovision --app [APP_HANDLE]Replace [APP_HANDLE] and [ENVIRONMENT_HANDLE] with appropriate names for your application and environment.
Tips
- Continuously review and improve your test suite as your app evolves.
- If your Django app has a frontend component, consider using browser testing platforms that integrate with Aptible to test across different browsers and devices.
- See our Best Practices Guide for more information on setting up your Aptible account with a production-ready environment.
Scaling and Maintenance
Applications hosted on Aptible may encounter fluctuating demands. To manage this, users can either allocate additional resources to their environment or extend their deployment to include more containers.
Aptible uses a load balancer to manage traffic across multiple containers, ensuring efficient distribution of network requests. Aptible's scaling configurations support various methods, which are detailed in the subsequent sections.
Learn more about how scaling works on Aptible.
Manual Scaling
In Aptible, manual scaling offers users the ability to intentionally adjust resources based on anticipated needs. This means you can pre-emptively allocate more containers or resources when expecting higher traffic or scale down during off-peak periods to conserve resources.
To manually scale your app, navigate to the deployment settings in the Aptible dashboard. Navigate to the Environment in which your App lives, select the Apps tab, select the Django App, then select Scale.
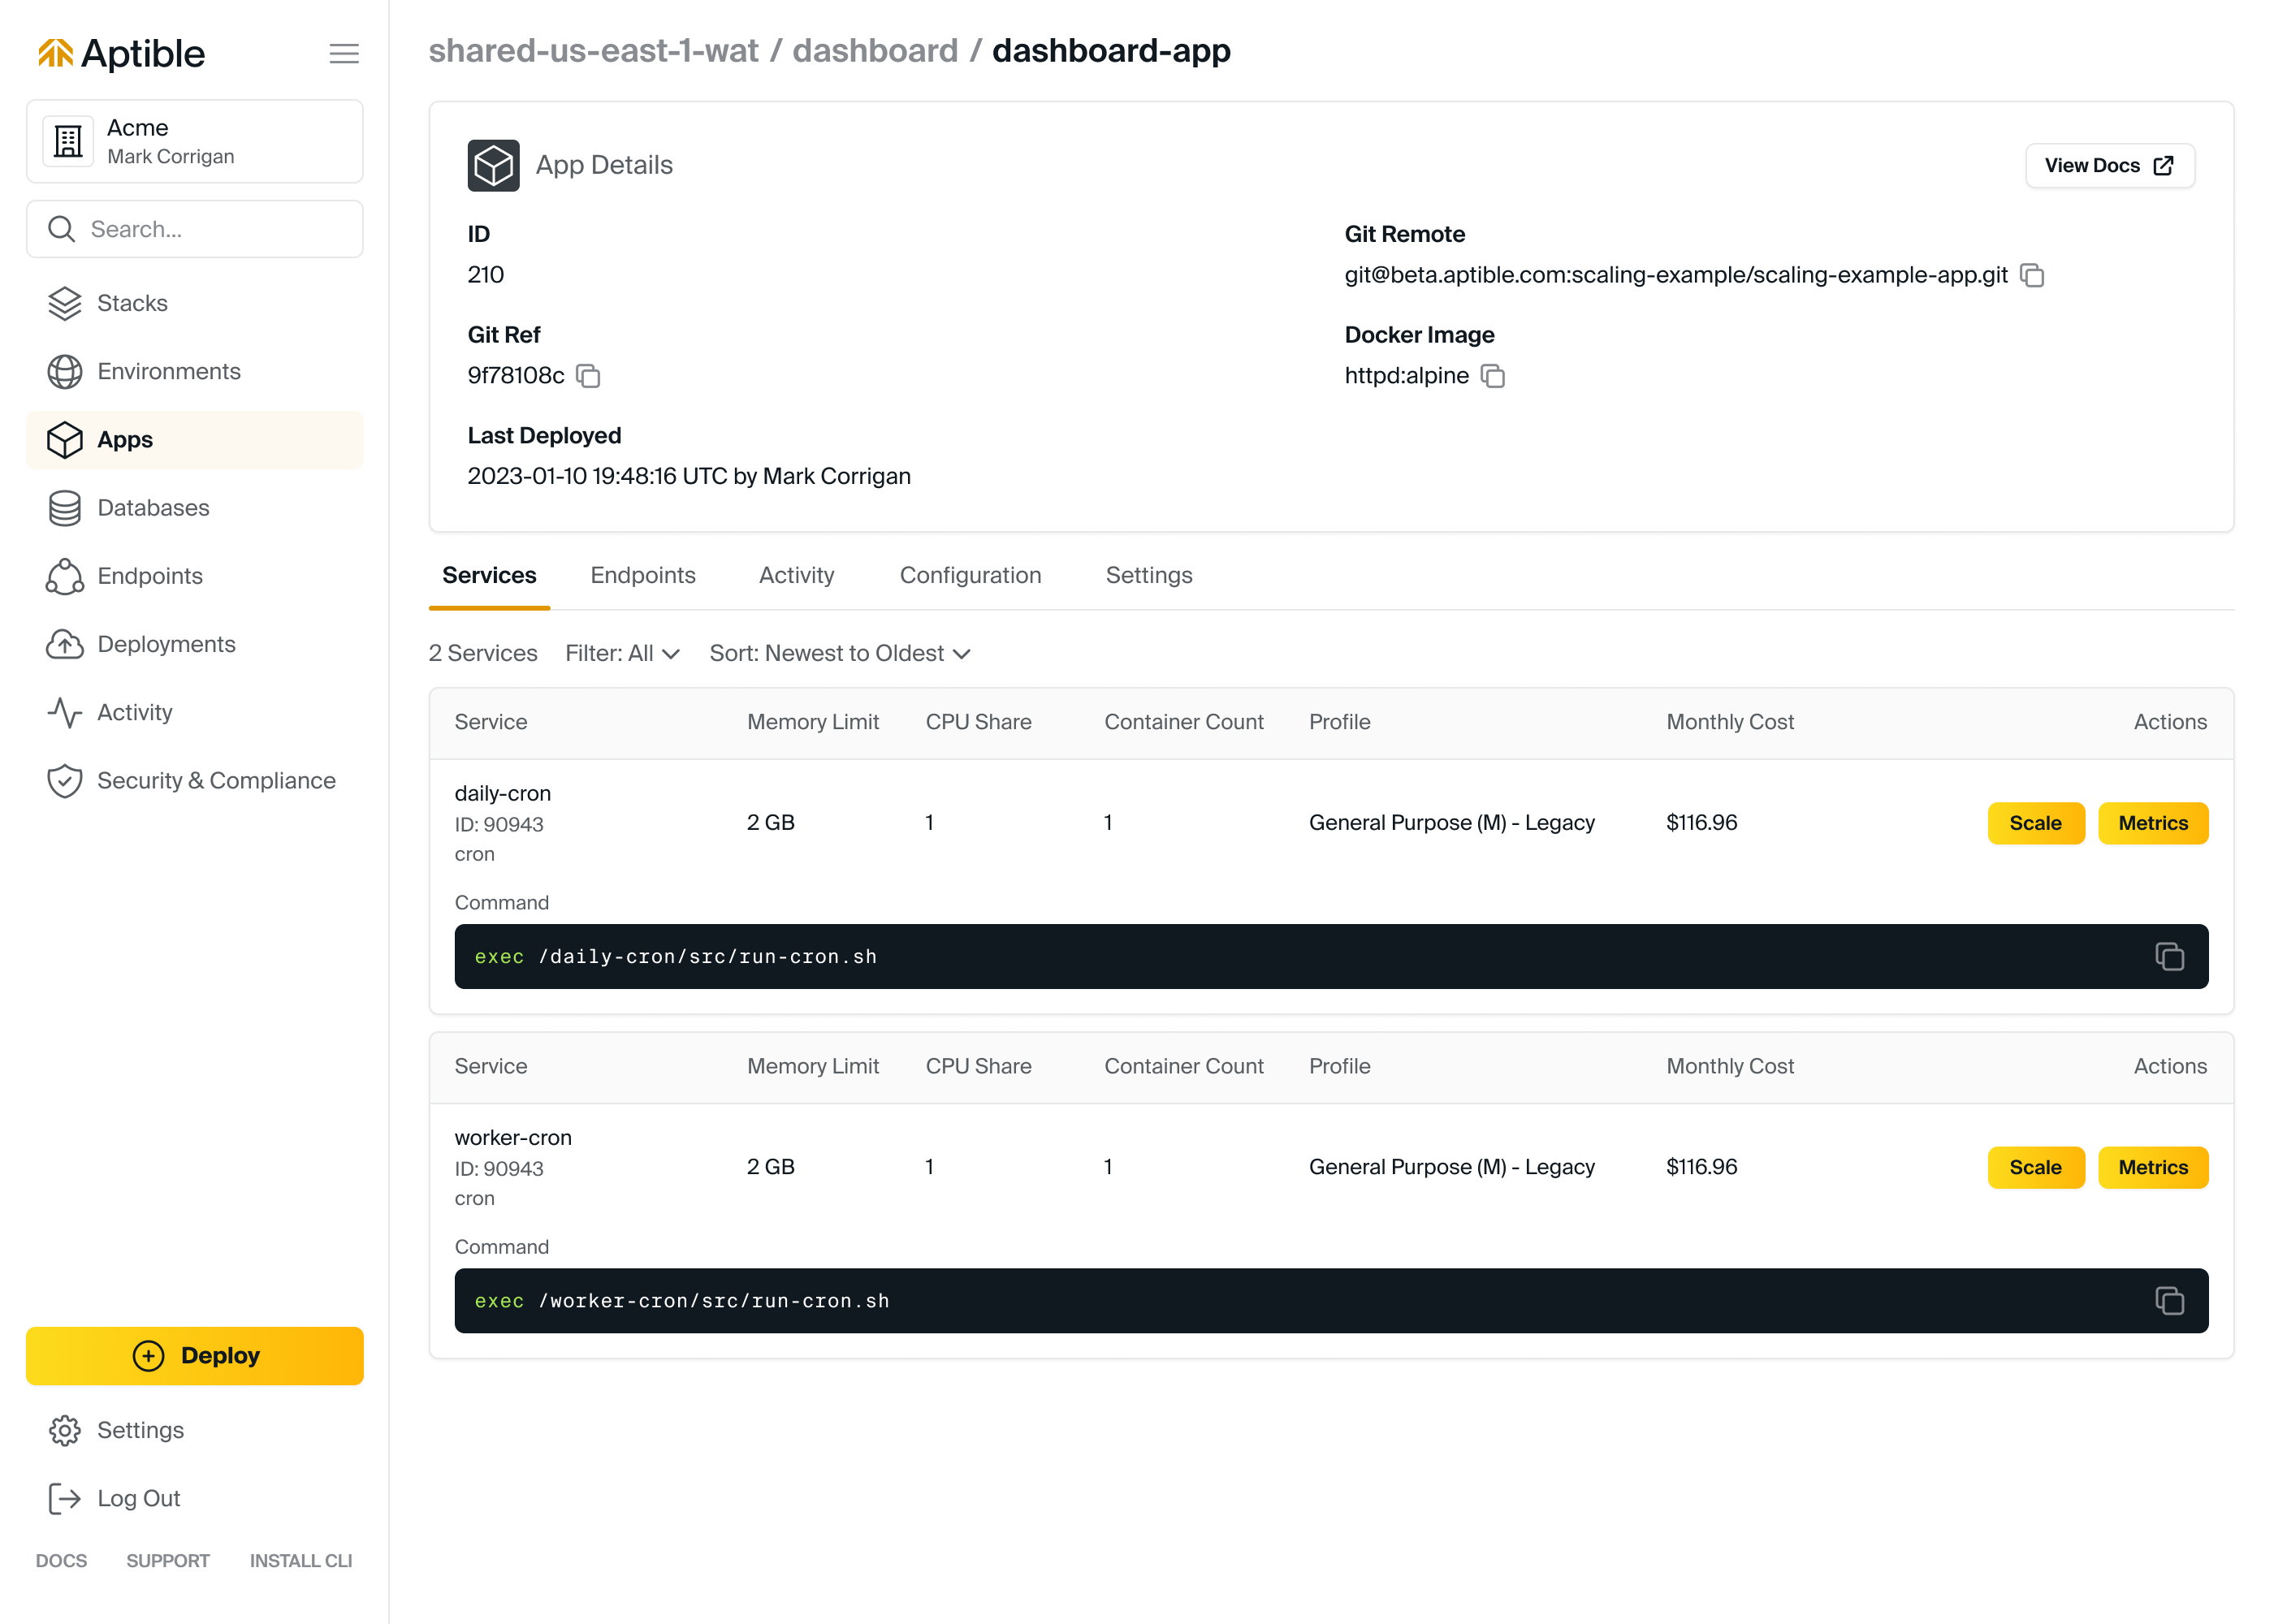 To scale your Aptible app, you can use the
 aptible apps:scale command, the Aptible dashboard, or the Aptible Terraform Provider.
From here, you can specify the number of containers or the amount of resources to allocate. This method provides greater control over the resources available to your application, but it can also be more expensive. You should carefully consider your application's demands and monitor its performance closely to ensure that you are not over-provisioning resources.
In addition to scaling horizontally, you can also scale vertically by increasing the resources available to a single container. This can be done by increasing the amount of CPU, memory, or storage allocated to the container. Scaling vertically can be a more cost-effective way to scale your application, but it can also be more complex to manage.
Step-by-Step Scaling & Maintenance Instructions
Note: Remember to replace placeholders like [APP_HANDLE], [DATABASE_HANDLE], [DESIRED_SIZE], and [NEW_VERSION] with the appropriate names or values for your application and environment.
Step 1: Monitoring Performance Metrics
Before scaling, it's important to know the current performance of your app. Use Aptible’s built-in metrics or metric drains.
Step 2: Scale Containers Vertically (Resources per Container)
Scale your Django apps vertically by changing the size of Containers, i.e., changing their Memory Limits and CPU Limits. The available sizes are determined by the Container Profile. Aptible offers a variety of container profiles: general purpose, CPU optimized, and RAM optimized.If your app requires more resources, you can increase the container size.
aptible apps: scale--app "$APP_HANDLE" SERVICE \
--container - size SIZE_MB
Step 3: Scale Containers Horizontally (Number of Containers)
Scale your Django apps horizontally by adding more Containers to a given Service. Services scale up to 32 Containers. Note that apps scaled to 2 or more Containers are automatically deployed in a high-availability configuration, with Containers deployed in separate AWS Availability Zones. If you need to handle more concurrent connections or distribute traffic, add more containers. For example, to scale the web Service to 2 containers, you would use the following command:
aptible apps: scale--container - count [DESIRED_NUMBER]Note: Replace [DESIRED_NUMBER] with the number of containers you want.
Step 4: Scale Containers Horizontally (Number of Containers)
Aptible users can restart a database to resize it. For example, the command below restarts the database and resizes it to 2048 MB.
aptible db:restart "$DB_HANDLE" \
--container - size 2048
Step 5: Regular Backups
Aptible automatically backups your databases every 24 hours. You can also configure Aptible to retain additional daily and monthly backups. For monthly backups, Aptible will retain the last automatic backup of each month. This means that you will always have at least one backup of your database that is no more than one month old. You can view your database backups in two ways:
- Using the
aptible backup:listcommand.
2. Within the Aptible Dashboard, by navigating to the Database > Backup tab.
Step 6: Database Maintenance & Upgrades
Aptible SRE will monitor and maintain critical patches for your databases.
Step 7: Periodic Reviews with Aptible Metrics
Routinely monitor the metrics provided by Aptible. This helps in understanding when to scale up/down and in ensuring optimal performance. The following code will get the list of all metrics for the current environment.
import aptible

def get_metrics():
"""Gets the metrics for the current environment."""
client = aptible.Client()
metrics = client.metrics.list()

return metrics

def main():
"""Periodically reviews Aptible metrics."""
metrics = get_metrics()

for metric in metrics:
  print(metric.name, metric.value)

if __name__ == "__main__":
  main()
Step 8: Periodic Reviews with Aptible Metrics
For anticipated traffic spikes, pre-scale your app and database temporarily. Once the traffic normalizes, you can scale down to manage costs.
Step 9: Regular Security Reviews
Periodically check for updates and ensure your Django app and all dependencies are up-to-date. Use Aptible's built-in features to run regular vulnerability scans.
Step 10: Cleanup and Optimization
Remove unused services, endpoints, or databases to optimize costs and performance.
aptible apps: deprovision--app[APP_HANDLE]The code above needs to be specific to resource to deprovision. Only run this if you are sure you want to remove the app permanently. However, before running the command, take note:
- Be Specific: Ensure the
[APP_HANDLE]is correctly specified to avoid accidentally deleting the wrong resource. - Finality: This action is irreversible. Once you deprovision an app, it's gone forever. Double-check and be 100% sure before proceeding.
- Backup: Always have a backup of your data, especially if you're making significant changes or deletions
Tips:
- Set up metric drains to monitor your Django app's performance and receive alerts when metrics go beyond your desired thresholds.
- Always test changes in a staging environment before applying to production.
Troubleshooting and Debugging
Troubleshooting and debugging your Dockerized Django app are inevitable. Doing so will help you maintain a reliable and smoothly functioning application. Follow these steps to identify and resolve issues quickly:
Logging and Error Handling
Implementing comprehensive logging in a Django app is vital for diagnosing issues and understanding the behavior of your application. Let's break down logging and error handling in a Django app in Aptible:
Step 1: Initialize Comprehensive Logging
Setup Django Logging in settings.py:
- Define formatters, handlers, and loggers as provided in your existing guide.
- Ensure log files, such as debug.log, have correct permissions and are accessible.
Implement App-level Logging:
import logging
logger = logging.getLogger(__name__)
Handle Exceptions in your views or other components:
def some_view(request):
try:
        # some code here
    except Exception as e:
logger.error(f"Error encountered: {e}")
Step 2: Capture System-Level Logs
- Database Queries: Configure
django.db.backends logger. - Server Operations: Ensure logs from Gunicorn, uWSGI, or other servers are captured.
Step 3: Integrate Error Reporting Tools
Use tools like Sentry:
- Install Sentry’s SDK pip install
sentry-sdk - Setup Sentry in your Django project:
import sentry_sdk
  from sentry_sdk.integrations.django import DjangoIntegration

sentry_sdk.init(
  dsn = "YOUR DSN HERE",
  integrations = [DjangoIntegration()],
  traces_sample_rate = 1.0,
  send_default_pii = True
)
Step 4: Review Configuration Settings
- Verify Debug Mode: Set debug to
STDOUT(local file isn’t recommended). WithSTDOUTfor errors, users can review log drain to check logs. - Database Settings: Confirm database settings in
DATABASESdictionary. - Domain Verification: Confirm your domain is listed in
ALLOWED_HOSTS. - Static/Media Files: Check
STATIC_URL,STATIC_ROOT,MEDIA_URL, andMEDIA_ROOT.
Step 5: Review Configuration Settings
1, Check server or container: echo $MY_ENV_VARIABLE.t.
2. Confirm Django's accessibility to these variables using tools like python-decouple or django-environ.
Step 6: Confirm Third-Party Apps & Middleware
Review INSTALLED_APPS and MIDDLEWARE for correct configurations. Ensure no missing database tables or middleware errors.
Step 7: Validate External Service Configurations Confirm connections to caching services, message brokers, or any third-party services. Ensure no missing database tables or middleware errors.
Step 8: Use Django's built-in Troubleshooter
Run: python manage.py check and address any warnings or errors.
Step 9: Verify Custom Configurations Ensure any custom settings (API keys, service URLs) are correctly set.
Step 10: Examine Logs on Aptible
- To check your Django app's logs for any unusual behaviors or errors, you can use Aptible's built-in logging dashboard or CLI.
- You can also use a log drain to send your app's logs to a third-party service for analysis. This can be useful if you want to use a more sophisticated logging solution than Aptible's built-in logging.
- Choose a Log Management Service: Aptible doesn't store logs for you long term. Instead, you'll use a Log Drain to send logs to a third-party log storage and analysis platform.
- Ensure your Django App is Logging Properly. By default, Django logs errors, but if you want more detailed logs, update your Django
settings.py
LOGGING = {
  'version': 1,
  'disable_existing_loggers': False,
  'handlers': {
    'console': {
      'class': 'logging.StreamHandler',
    },
  },
  'loggers': {
    'django': {
      'handlers': ['console'],
      'level': 'DEBUG',  # Change this as per your needs
            'propagate': True,
    },
  },
}
This configuration logs Django-related messages to the console, which Aptible captures and can forward to your log drain.
5. Monitor and Analyze Your Logs. Once logs start flowing into your log management service
- Set up alerts to be notified about critical errors or suspicious activities
- Regularly review logs to ensure the application is running smoothly
- Use the search and visualization tools of your log management service to dig deep into issues
6. Troubleshoot Issues When issues arise:
- Use filters to narrow down the logs to a specific time frame or severity level
- Identify patterns — Are errors coming from a specific part of your app?
- Correlate with other events> Were there any deployments or changes around the same time?
- Contact Aptible Suppport if you're stuck
Deploying Django on Aptible: Comprehensive Guide
- Overview
- Quick Links
- Deploy a Django App on Aptible
- Prerequisites
- Clone the Repo
- Static and Media Files Handling
- Using Docker Compose
- Local Development with Docker Compose:
- Deploy to Aptible
- Database Setup
- Testing and Quality Assurance
- Scaling and Maintenance
- Manual Scaling
- Step-by-Step Scaling & Maintenance Instructions
- Troubleshooting and Debugging
- Logging and Error Handling